

01. THE Classic Swirl
Start by pinching a small section in the center of the shirt. Hold on to that small section while you twist the shirt clockwise.
Keep twisting, keeping your fingers close to the surface of the table so the spiral stays flat
As you twist, the shirt will fold in on itself like a flat cinnamon roll.
Secure the shirt with 3 or 4 rubber bands, crisscrossing them over the center of the disc. The tighter you bind the shirt, the more white areas there will be.
Apply a different color of dye in each “wedge” created by the crisscrossing rubber bands. Apply the dye in rainbow order to get a rainbow spiral design.


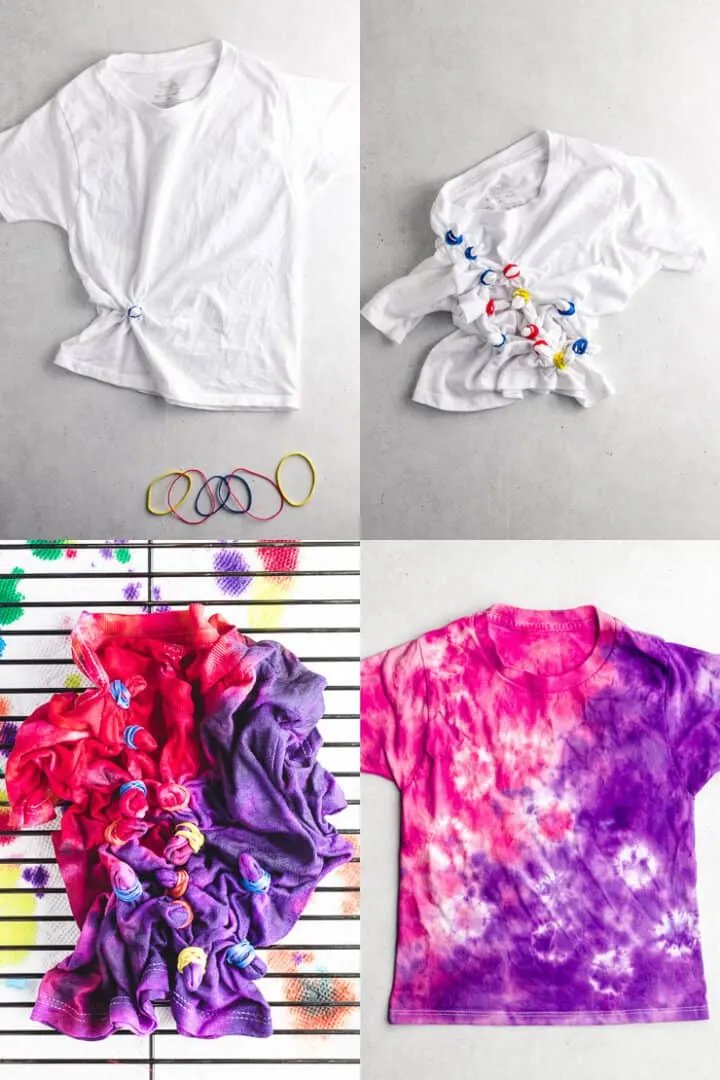
02. THE Crumple
First, lay the shirt flat. Then, scrunch smaller sections of the fabric together randomly.
Keep scrunching and folding, gathering all of the fabric into a relatively flat, tight disk.
Wrap several rubber bands around the disk. The tighter you scrunch it, the more white areas there will be in the final shirt.

03. THE STARBURST
Lay the shirt flat on a table. Pinch a small section of fabric, and pull it up to create a small pointed cone shape.
Wrap a rubber band around the small cone of fabric, about 1/2 to 1 inch down from the point of the cone.
Repeat this process, pinching another small section of fabric to create another cone. Secure with a rubber band.
Make as many sunbursts as you like.
Apply 1 or 2 colors of dye for the background color.
04. the zebra
Lay the shirt flat. Starting from the left sleeve, fold the shirt in a series of 1″ accordion folds. Alternate the folds back and forth, like you’re making a paper fan.
Secure the folded shirt with rubber bands, placing a rubber band every 1 to 2 inches.
To create stripes, apply dye colors in alternating sections.

05.THE Kaleidoscope
For this look, you’ll be creating a design with multiple lines of symmetry. To do this, you’ll first fold the shirt into a wedge shape and apply the dye in whatever combination you like. Then, when you unfold the shirt, you’ll reveal the unique kaleidoscope pattern.
Lay the shirt out on the table. Fold it in half lengthwise. Then fold in half again widthwise. The shirt is now folded into quarters.
Following the diagram above, fold the shirt in half along the diagonal line. The shirt is now folded in eighths.
Following the diagram above, fold the shirt in half again along the diagonal line. The shirt is now folded into sixteenths.
Secure with rubber bands.
Apply the dye in various colors to create your unique design.


06.the chevron
First, lay the shirt out flat. Then, fold the shirt in half lengthwise.
Draw half of a chevron V-shape on the folded edge with a washable marker. You can position it higher or lower than mine, or make it pointing upward or downward – your choice.
Starting at one end of your line, begin making small accordion pleats. Follow along the drawn line, folding the pleats in such as way that the marker line appears straight on the top of the folds.
When all of the fabric has been pleated, secure it with a thick rubber band. Put a runner band on the line itself, and add more rubber bands on the inside or outside sections as desired.
For a color-blocked look, add 1 or two colors of dye. For a striped chevron look, apply the dye in small sections, alternating colors.

07. THE PROMISE RAINBOW
First, lay the shirt out flat. Then, fold the shirt in half lengthwise.
Draw half of a rainbow arch on the folded edge with a washable marker.
Starting at one end of your line, begin making small accordion pleats. Follow along the drawn line, folding the pleats in such as way that the marker line appears straight on the top of the folds. This means that you’ll be making the pleats a little deeper on the outside section and a little shallower on the inside section to accommodate the curve of the line.
When all of the fabric has been pleated, secure it with a thick rubber band. Put a runner band on the line itself, and add more rubber bands on the inside or outside sections as desired.
Apply the dye in rainbow order to create a traditional rainbow color scheme.


08. THE double-take
Lay the shirt flat. Starting from the bottom-left corner, fold the shirt in a series of 1″ accordion folds. Alternate the folds back and forth, like you’re making a paper fan.
Folding the left sleeve can be a little tricky, but try to keep it in line with the rest of the folds.
Secure the folded shirt with rubber bands, placing a rubber band every 1 to 2 inches.
To create stripes, apply dye colors in alternating sections. Or, create a color-blocked design like the shirt in the pictures above.

09. The Bullseye
Lay the shirt flat on a table. Pinch a small section of fabric at the center of the shirt. (If you want the bullseye to be off-center, choose a small section off-center.)
Pull the pinched fabric up to a point, and smooth the rest of the shirt down to create a skinny cone shape.
Wrap rubber bands around the cone of fabric, starting about an inch below the point of the cone. You can add as many or as few rubber bands as you want.
To make stripes, apply alternating colors of dye.


We can’t wait to see what you create!
For these and even more ideas, click here!